[ Configure SAP Solution Manager Service Desk in 1 Day ] More often than not the Solution Manager Service Desk solution is overlooked when looking at Service Desk software options. If your organisation currently uses SAP and requires Service Desk functionality then Solution Manager Service Desk is the ideal solution from both a feature and cost perspective. The guide will be split into the following sections:
Important Note::
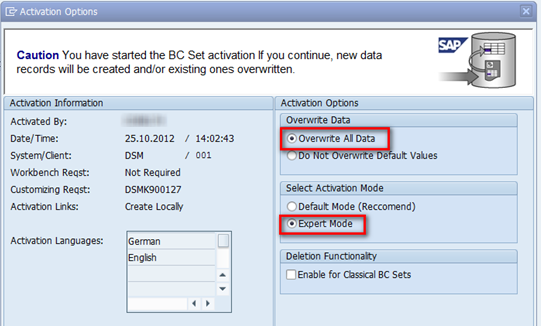
Section 1 – Basic Configuration This section will setup will guide you through the basic configuration which will be the foundation for all additional work. Activate BC sets Making reference to Note 898614 - Solution Manager Service Desk: BC sets Transaction: SCPR20 Activate the following BC sets:
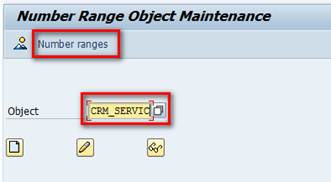
Add to transport Repeat for all of the above BC sets. In the 000 client of your Solution Manager, create a new transport request (with the transaction SE10) Unpack the file Piecelist_Service_Desk_Init.zip from the attachment to the note. Copy the contents of the file Piecelist_Service_Desk_Initial.txt to the transport request. Contents of file below: Use transaction SCC1 to import the transport request to your Solution Manager client. Now we have a solution manager with all the basic customizing for the Service Desk Scenario. This basic customizing implements a transaction type named SLFN, which encapsulates a notification message SLF1. Check Number range Transaction: SNUM
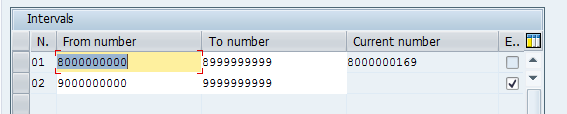
Change Intervals Check if you have an interval number 02. If not create a new interval numbered 02 (for example 9000000000 to 9999999999) with the External Number Range Box flagged.
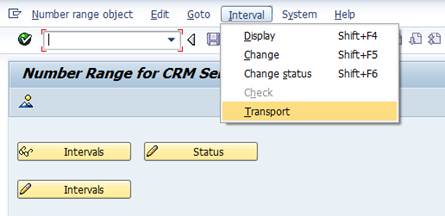
Add number range to a transport:
Activate the Partner/organisation integration Transaction: SPRO
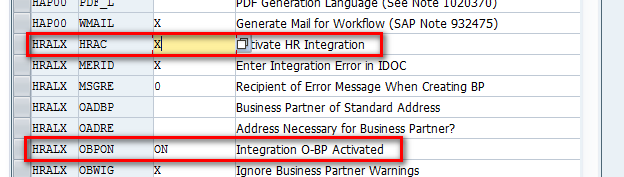
Make sure that HRALX HRAC = X and HRALX OBPON = ON
Generation Business Partner Screens Transaction: BUSP
Complete the selection screen parameters as per below: Client : <client in which the business partner should be created> (Service Desk Client)
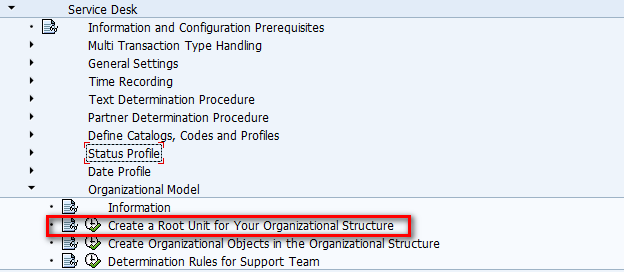
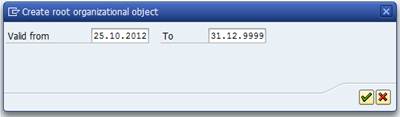
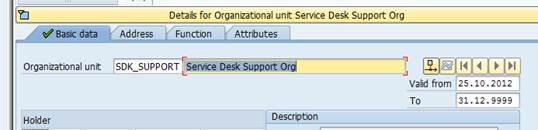
Create the root organizational Model
Fill in all the required fields including country and city.
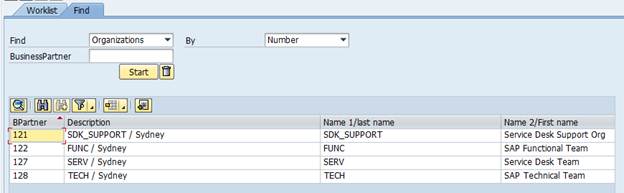
Save and note the business partner number:
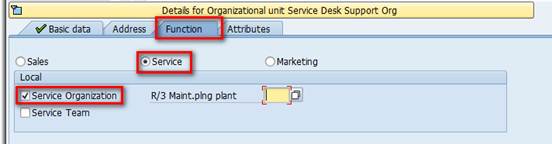
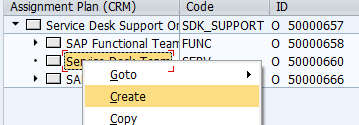
Create the Support Team Organization Transaction: PPOMA_CRM Build the support team structure by creating new org units and completing the same checks as above. In the below example we will build a support structure with three teams:
Create/Assign positions
Right click on org unit and select “create”
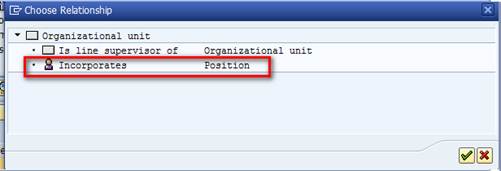
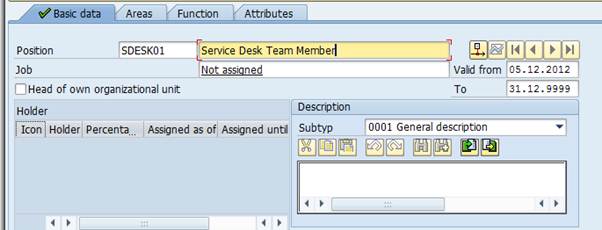
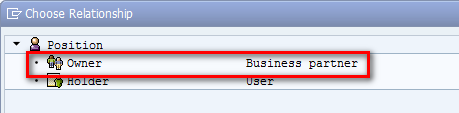
Select Position:
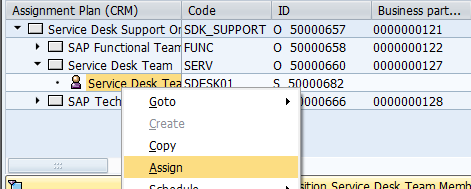
Now assign a business partner to the position. Right click on the newly created position and select “Assign”
Changes are now reflected in the org structure.
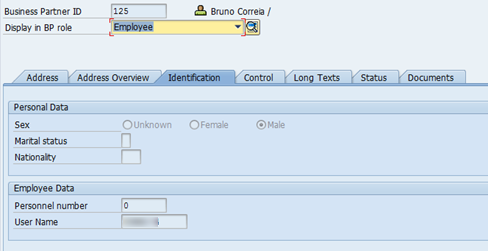
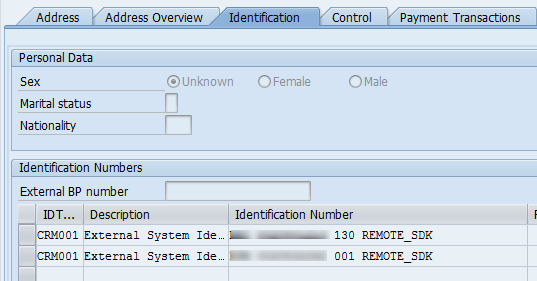
Create Business partners for users Transaction: BP Different user types require different business partner configurations. The two main user types are shown below: Support Team Members: General Business Partner role and Employee Role. Take note of the identification number format. Each BP must have an identification number for each system that they will be creating messages from including the service desk system. <SID> <Install Number> <Client> <UserID>
If the user is part of a support team then the BP must also have the “Employee” role assigned
As mentioned previously, Business partners need to be assigned to positions.
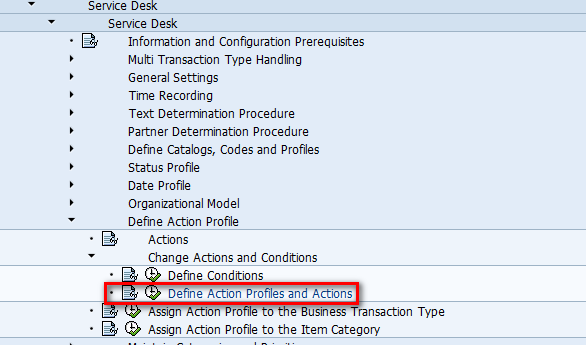
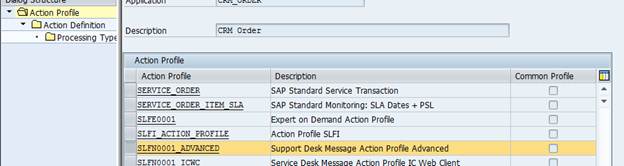
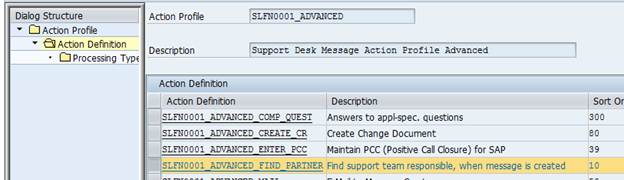
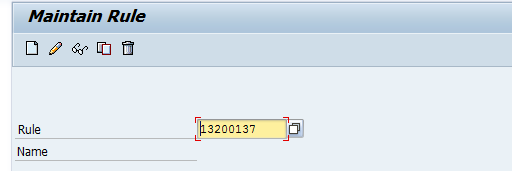
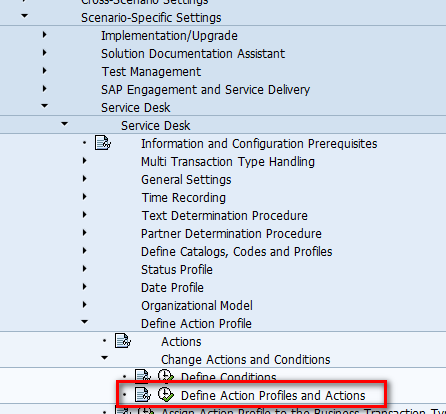
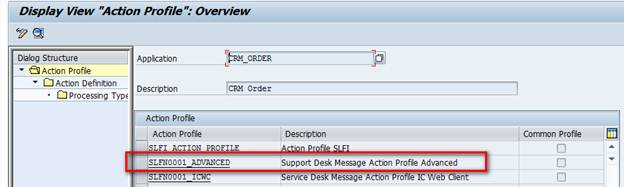
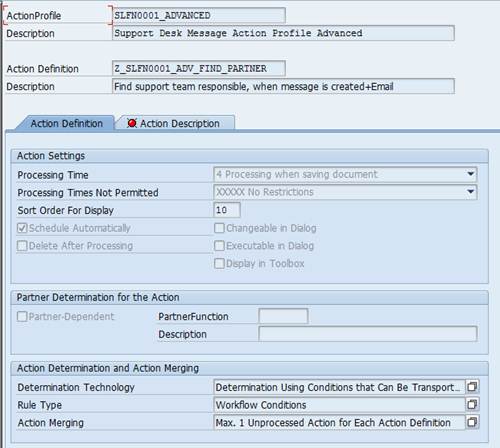
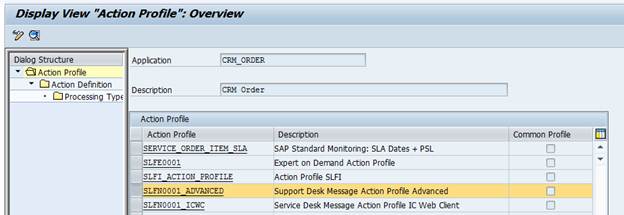
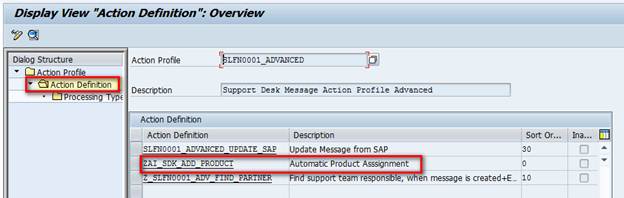
Support team determination The Support Team is defined using determination rule CRM_DNO_1 (technical name AC 13200137). This rule is triggered by an action that is processed when a Service Desk message is saved. The rule bases the determination on responsibilities. The call assignment can be determined based on various criteria. (eg. SAP component) Transaction: SPRO Service Desk message--> transaction type SLFN-->Action profile SLFN0001_ADVANCED-->SLFN0001_ADVANCED_FIND_PARTNER action definition --> method CRM_DNO_PARTNER_1--> Display
Select the SLFN0001_ADVANCED action profile.
Navigate to the “Find Partner” definition:
Check the processing type.
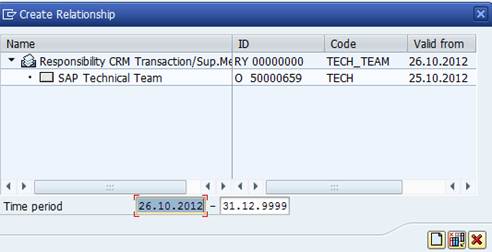
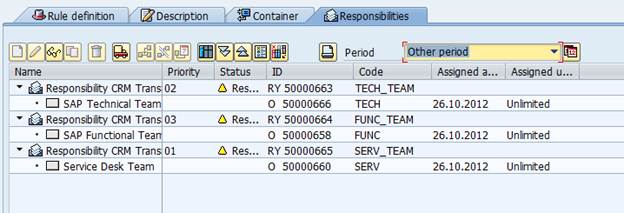
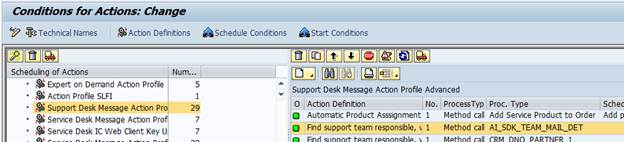
Now that we know the responsibility rule we will be configuring it to perform the below determinations in the below order:
1. If SAP Component = FI* assign to Functional Team 2. If SAP Component = BC* to SY* assign to Technical Team 3. If SAP Component = A* to Z* assign to Service Desk Team
Note that the order is extremely important and in this case the Service Desk team is used as a catch all just in case the first two teams do not get the assignment. It should also be noted that SAP priorities work in reverse. The higher the number the higher the priority.(i.e. 03 will be actioned before 01) Transaction: PFAC
Repeat for other teams Make sure that you also have a catch all: Assign agents to rules
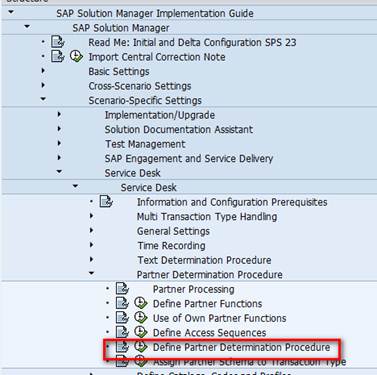
Transaction: SPRO Choose 'SAP Reference IMG' --> Customer Relationship Management --> Basic Functions --> Partner Processing --> Define Partner Determination Procedure. Select the partner determination procedure "SLFN0001 Service Desk Partner Header" and choose "Partner Functions in Procedure" in the tree structure in the left-hand screen.
Select SLFN0001 partner determination:
Select "SLFN0003 Support Team (CRM)" and ensure that the access sequence in the "Partner Determination" is empty.
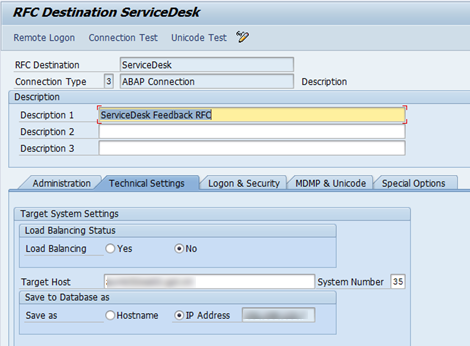
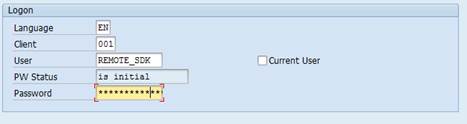
Setup Customer Feedback functionality Transaction: SM30 à BCOS_CUST As the contents of the BCOS_CUST table is transportable it is recommended to specify an RFC destination with a generic name that does not indicate the type of system (i.e. dev, test, prod) An example RFC name could be "ServiceDesk" so the next step is to create the RFC destination using transaction SM59. Take note of the UserID within the RFC destination as it will have to be created as a user and a business partner with the correct identification will have to be created. this will be further explained below. Create RFC destination(s) SM59
Create “REMOTE_SDK” userID in the service desk system as a “system” user.
Test RFC connection. Now remote messages can be created.
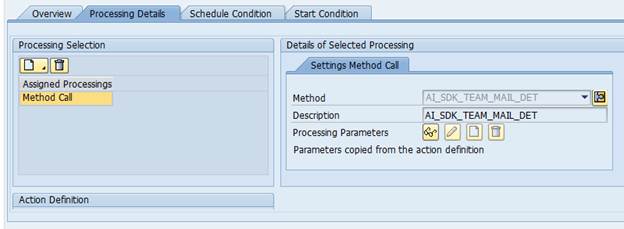
Create Email during support team determination Apply the following note: Complete the manual steps as per note instructions: Part A: 1. Use transaction SE19 to create a new BAdI implementation for the classic BAdI EXEC_METHODCALL_PPF. Defined filter: AI_SDK_TEAM_MAIL_DET Short text: Support Team Determination and Email for Service Desk SAP package: AI_SOLAR_SDK_BASE The system may issue the following error message: "Filter value AI_SDK_TEAM_MAIL_DET violates namespace convention of table PPFTFLTVAL". Ignore this message and continue with the creation process.
Save your changes and activate the new BAdI implementation.
2. Use transaction SE91 to create the following new messages in the message class AI_SOLAR_SDK: 131 Finding Support Team 132 Support Team &1 Found 133 Processing E-Mail
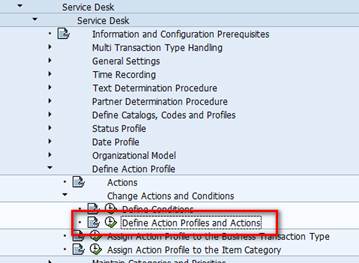
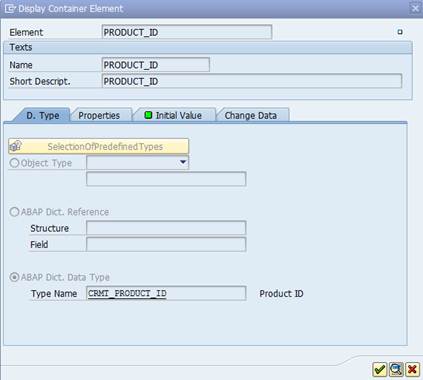
Part B: Create a new action in your action profile for the Service Desk message. Procedure: 1. Call transaction SPPFCADM, choose the application CRM_ORDER, and choose "Define Action Profile and Actions". Select the action profile that you use for the Service Desk message. 2. Copy the action "Find support team responsible, when message is created" to a new action with all its entries. 3. In the processing type of the action, enter the method AI_SDK_TEAM_MAIL_DET. 4. You must create the following processing parameters: Structure: CRMD_PARTNER Field: PARTNER_FCT Initial value: SLFN0003
b) Parameter for the support team determination rule Structure: PDTASK Field: SEARK Initial value: AC35000139
c) Parameter for the e-mail form Type name: TDSFNAME Initial value: CRM_SLFN_ORDER_SERVICE_01
d) Parameter to check whether e-mail notification is active Type name: CHAR1 Initial value: X
e) Parameter for the processing class for the e-mail Type name: SEOCLSNAME Initial value: CL_SDK_DOC_PROC_CRM_ORDER
f) Parameter for the processing method for the e-mail Type name: SEOCLSNAME Initial value: CRM_SRVORDER_EXEC_SMART_FORM
If you use different values to the values described above (for example, support team determination using rule 13200137), you must enter this value as the initial value accordingly.
5. Save your changes. 6. Return to the initial screen of the transaction. Then choose "Condition Configuration (Transportable Conditions)". 7. Select your action profile and use the "Create" pushbutton (white sheet of paper) on the right-hand side to add the action that you have previously defined. 8. Save your changes. 9. Afterwards, deactivate the action that you used previously to determine the support team.
Below are screenshots of all of the above steps.
Action conditions:
Possible Errors
If you get the below error in the action tab when creating calls:
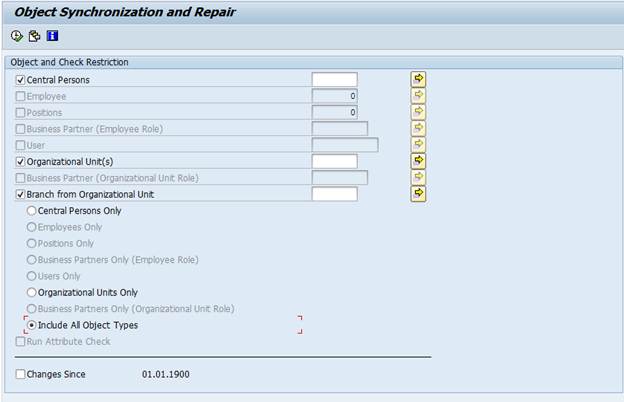
Complete the following: Transaction: SE38 - select central persons, orga. unit and branch from org unit and click execute
- It will fix the object and create the BP. If problem still exists apply the following note: Note 1512895 - Support team determination + e-mail notific. to support team
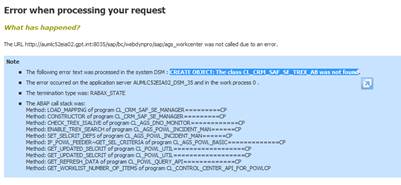
If you get the below error when running the workcenter: CREATE OBJECT: The class CL_CRM_SAF_SE_TREX_AB was not found Complete the following: Call transaction CRMC_SAF_ADV_CLIENT.
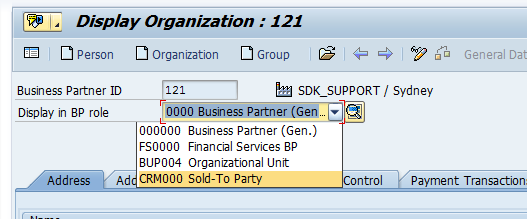
Assumptions: Check the IBase. Transaction: IB52 Make sure that you have assigned a “Sold-to-party” to ALL the required systems within the IBase.
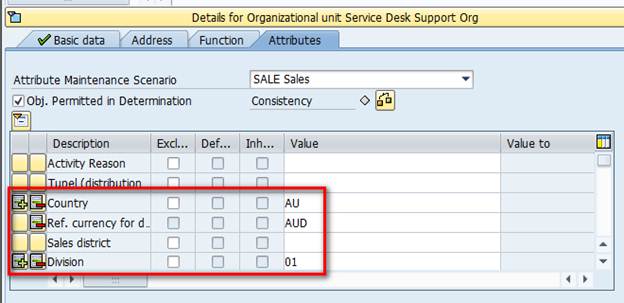
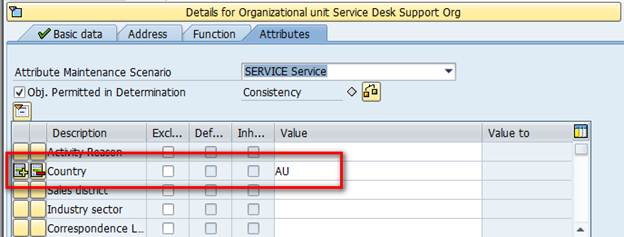
Organisational Model Transaction: PPOMA_CRM You will need to model both “Sales” and “Service” structures. (one org unit needs “Sales” for SLA to work) Sales: Service:
Note: The one org unit can have more than one structure. In our case we would like for the org unit to be both Sales and Service. Important note: Within both sets of attributes ensure that you update the country (AU) This is required as the service contract will use the following rules which are based on country. For “Sales” ensure that the following are also updated:
Update Sold-To-Party Business Partner Transaction: BP Enter the business partner of the sold-to-party
Select sales area data button
Update the “Sales Organisation” and “Distribution Channel” fields with the data from you support organisational model above.
Note: Even after saving when you redisplay this data it will be blank, but don’t worry the data has been saved. Check the BP via check button and save if no errors.
Creating a Base Hierarchy and Root Category Transaction: COMM_HIERARCHY
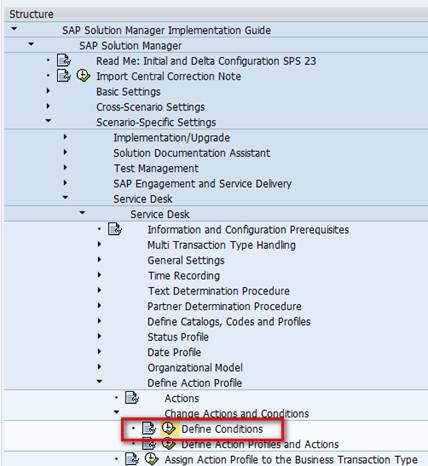
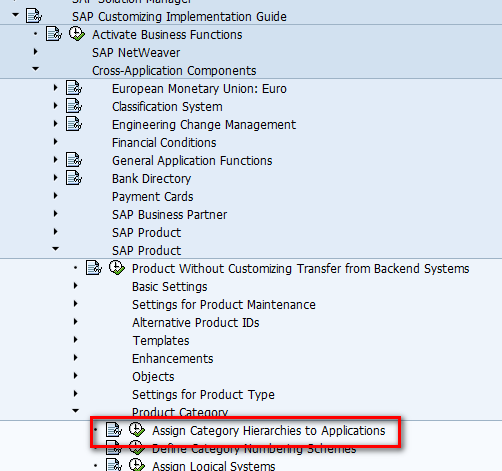
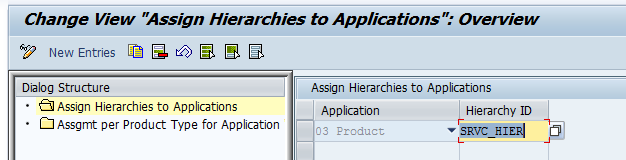
Assigning Category Hierarchy to the Application Transaction: SPRO
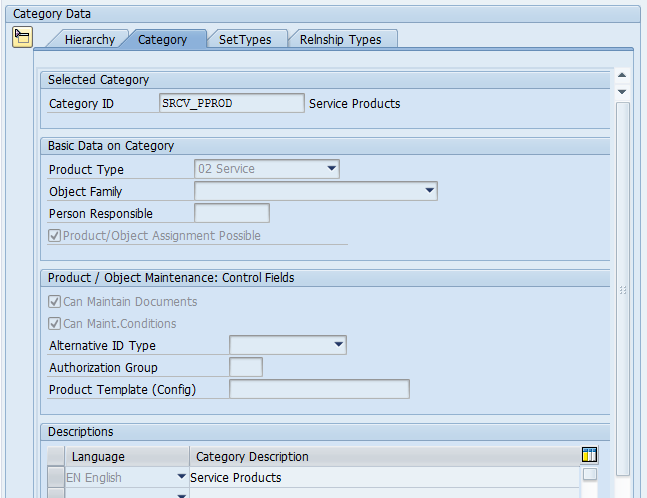
Creating a Category for Service Products Transaction: COMM_HIERARCHY
Make sure that the “Product/Object Assignment possible” check box is selected in the basic data on category section.
Add the below set types as shown above:
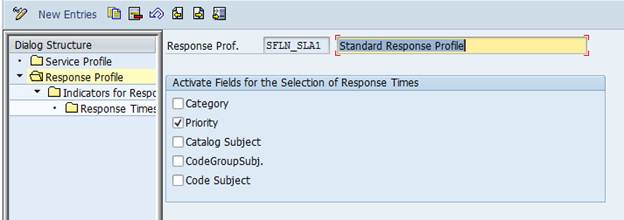
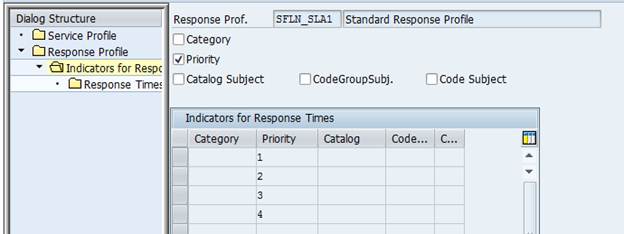
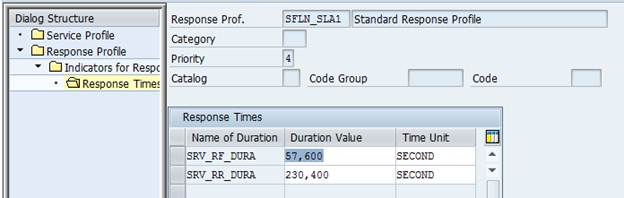
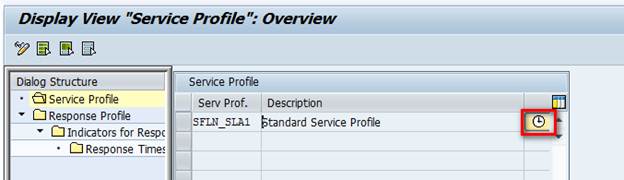
Create Service and Response Profile Transaction: CRMD_SERV_SLA
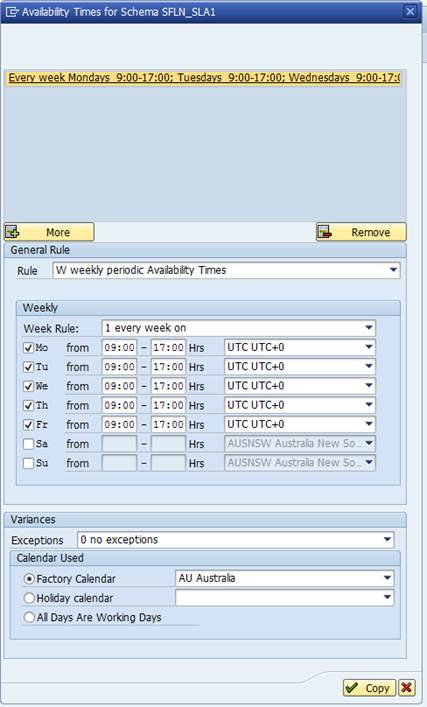
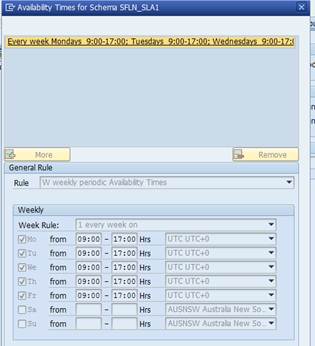
Set availability times
In this case we will be using “Priority” to determine the SLA rule to apply.
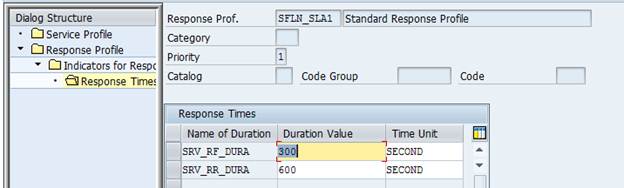
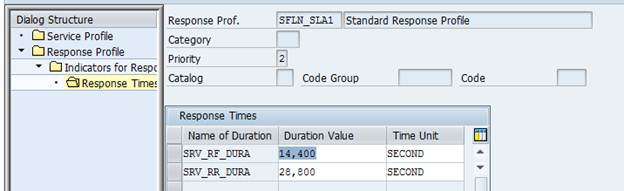
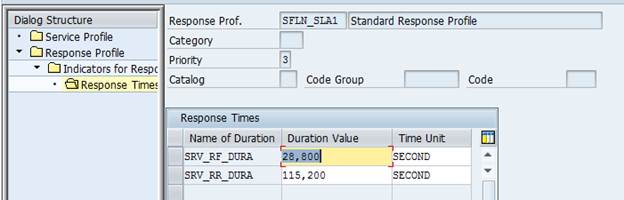
Create 4 different response indicators Select the time unit and duration. In this case we have used SECONDS, the reason for this will be explained later in this guide.
Note: Priority 1 has been set extremely low so that the SLA monitoring jobs can be tested.
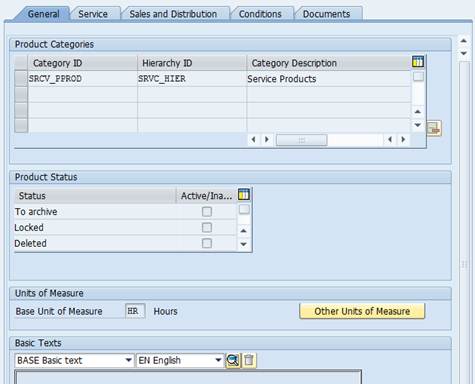
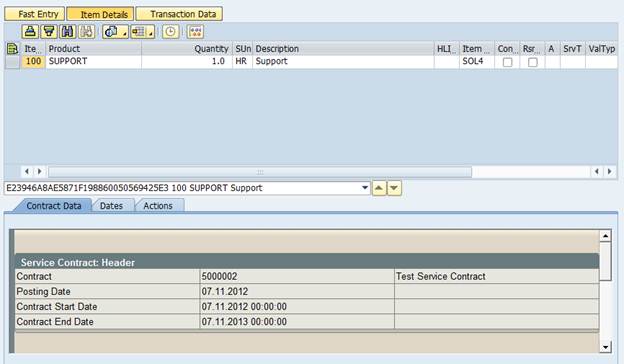
Create Service Product Transaction: COMMPR01 You need to create a service product in order to create service contracts. Below we will create a service product called “SUPPORT” Choose the Create Service pushbutton. In the dialog box that appears, choose the subcategory you created earlier as the category and then choose Continue. On the General Data tab page, enter data as required.
Assign the service profile and responsibility profile created earlier and check the times.
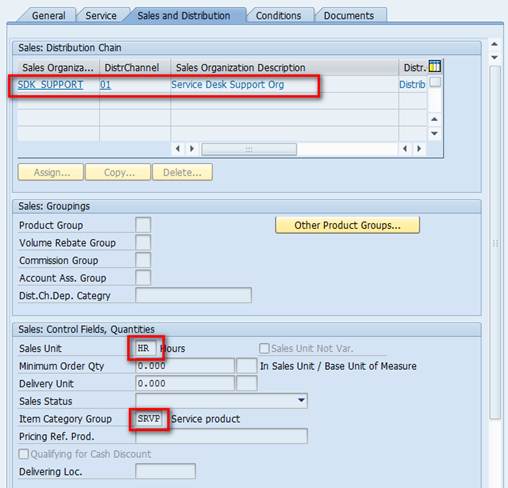
On the Sales and Distribution tab page, assign the product to the Sales organization and distribution channel 01. Enter the sales unit and item category group again.
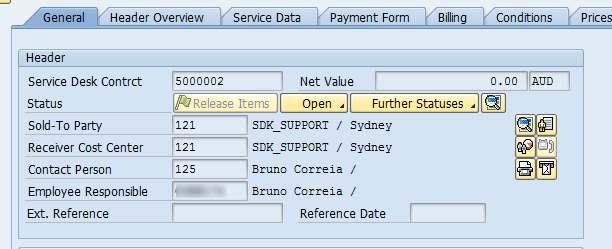
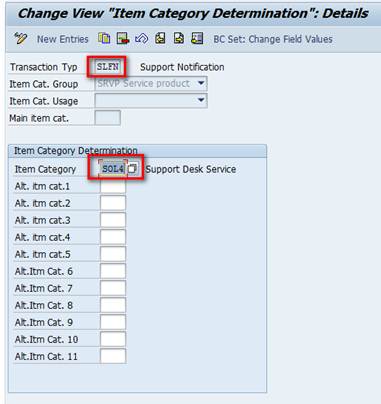
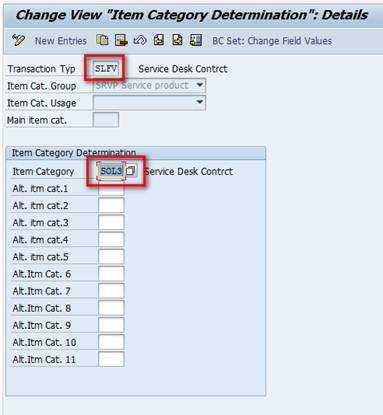
Create a Service Desk Contract (SLFV) Transaction: CRMD_ORDER The item category for SLFV is SOL3. Via menu: Business Transaction à Create Note: if you cannot see this entry “SERVICE DESK Contrct” ensure the BC-set SOLMAN40_SDESK_SLFV is activated in your solution manager system. Update the sold-to-party, receiver cost centre, contact person and employee responsible.
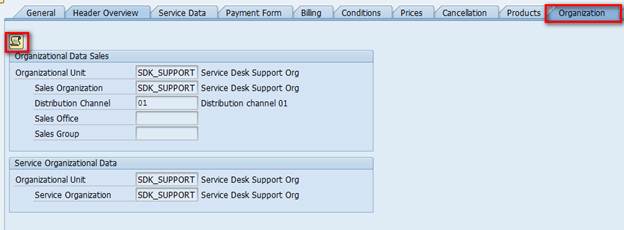
Check if sales and service organizations have been determined via the “organizations” tab and displaying the log.
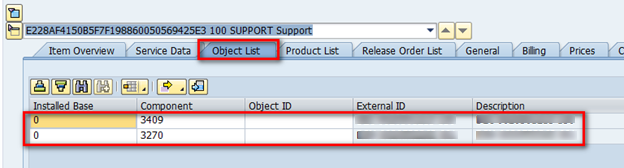
Another important aspect is to indicate the IBase components, for which the contract will be valid. If this is not required the object list can remain blank so that the contract will apply to all components. Switch to the product view of the contract and go to the Object List tab page, as shown below.
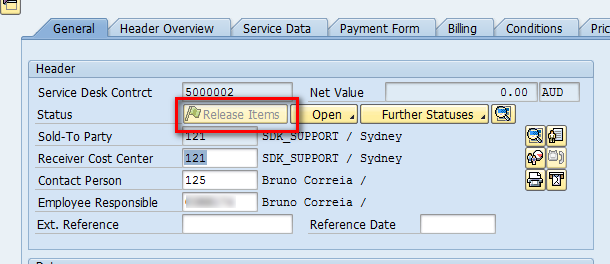
The last step is to release the service contract.
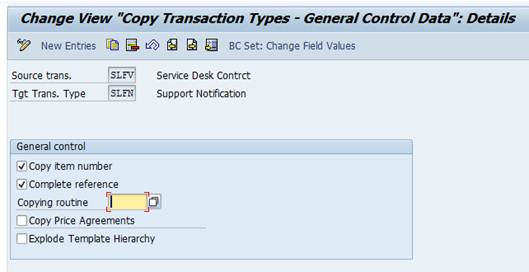
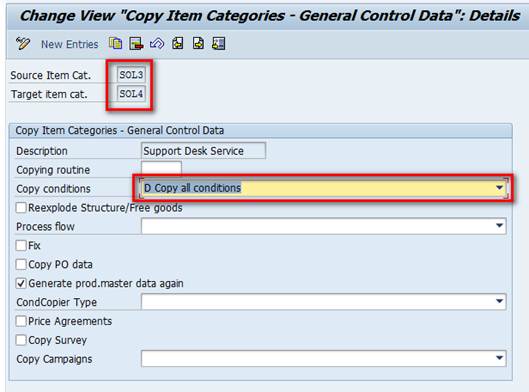
Copy Control Transaction: SPRO Customer Relationship Management ->Transactions -> Basic Settings -> Copying Control for Business Transactions ->Define Copying Control for Transaction Types
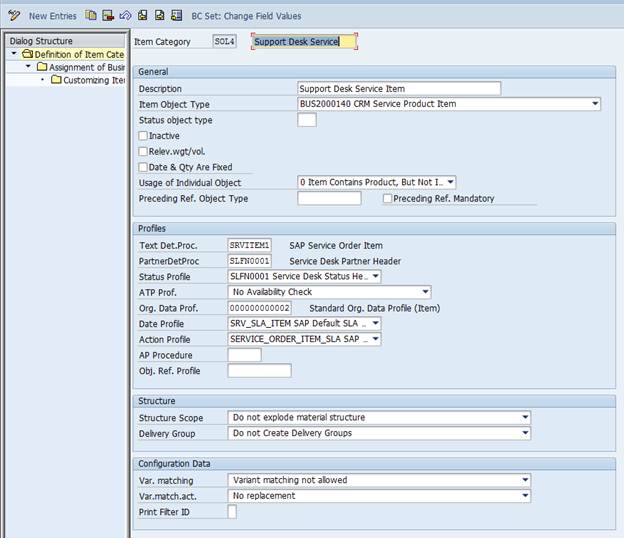
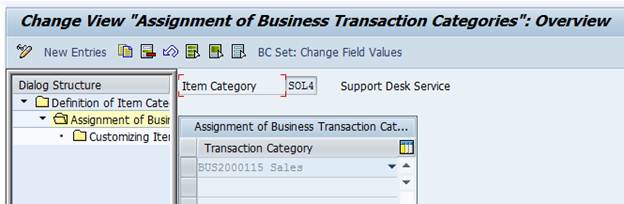
If you cannot find SOL4 please create it as per below.
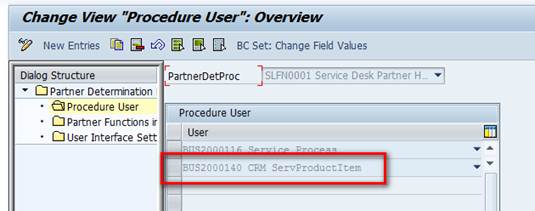
Update Partner profile In the Partner Determination Procedure of SLFN0001 add BUS2000140
Apply notes 1400326 and 1048685 if applicable.
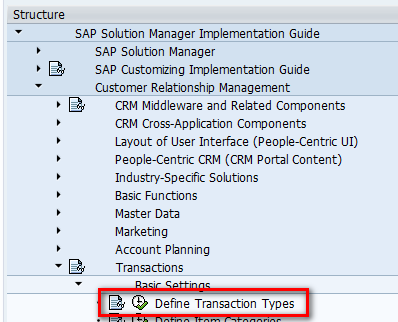
Determining Service Contracts (Contract Determination) Transaction: SPRO Customer Relationship Management à Transactions à Basic Settings à Define transaction type
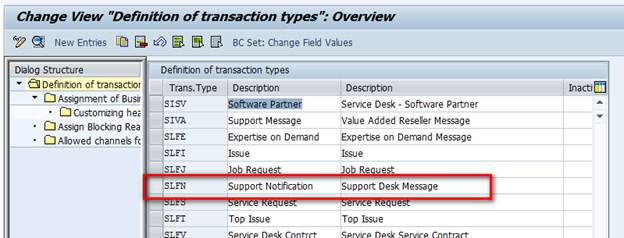
Select transaction type SLFN
Contract determination should be set to “E”
For uniqueness, that is, when only one contract is found which meets the selection criteria, the system automatically transfers all relevant data from the corresponding service contract item to the business transaction. Otherwise, a separate dialog box opens with a list of all contracts found, from which you can select the desired contract item. If you have selected the option ###Always with Selection Options in Customizing, the selection window is always opened in the business transaction. In this case, there no automatic assignment will occur.
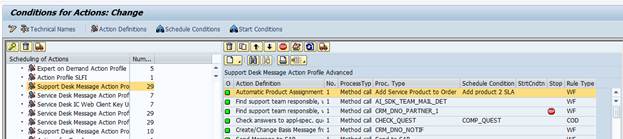
Contract determination procedure Create an action that will assign a product automatically.
Copy the standard action AI_SDK_ADD_PRODUCT from action profile AI_SDK_STANDARD
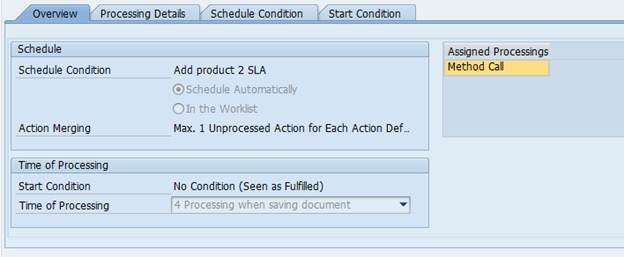
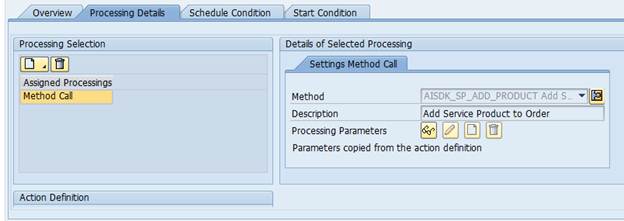
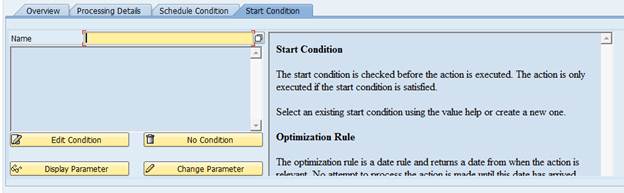
Define the conditions of this action
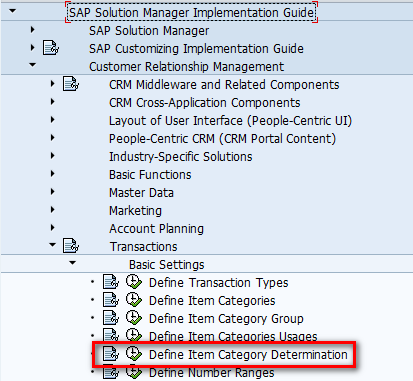
Define Item Category determination
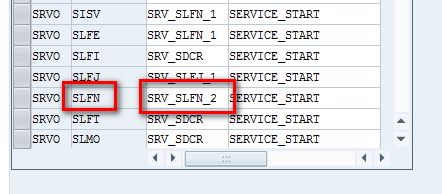
Add the item detail tab to Expert Mode. Setup screen profile Change SLFN from SRV_SLFN_1 to SRV_SLFN_2
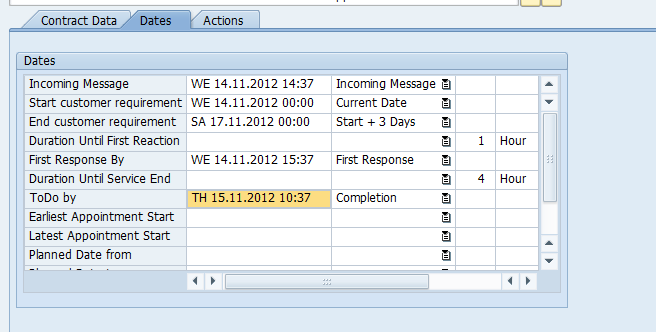
Modify start conditions as per SAP Note 485574 First update the response times to seconds
Now navigate to define action conditions
Complete for both actions
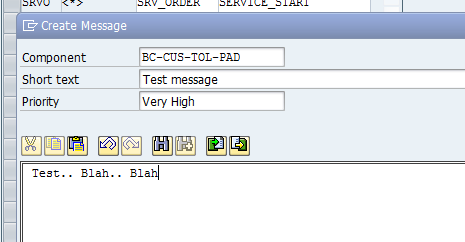
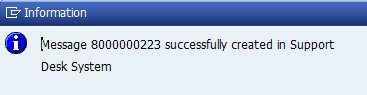
Test by creating a new message You can use any method to create the test message. In the below I have double clicked on the SAP logo.
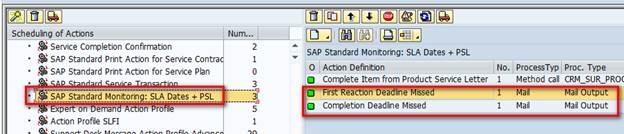
Transaction: CRM_DNO_MONITOR
If you get the following error: Apply the following note: Monitoring
Make sure that the time zone is set to: UTC UTC+0 regardless of the time zone you are in. Check the following action profile: Action definitions:
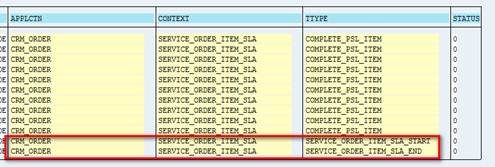
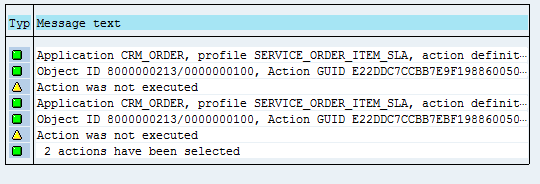
To check that the actions are correctly updating in the trigger table create a call and then run se16. Table name: PPFTTRIGG Execute.
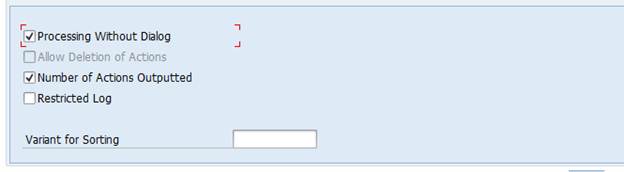
If you can see TTYPE Service_order_item_sla_start and Service_order_item_sla_start it has worked. Transaction: CRMC_ACTION_JOB
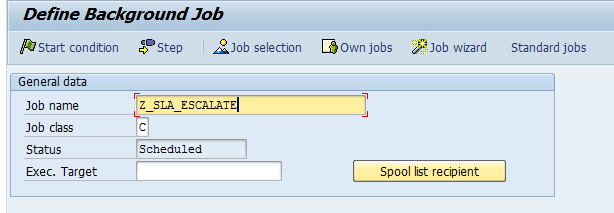
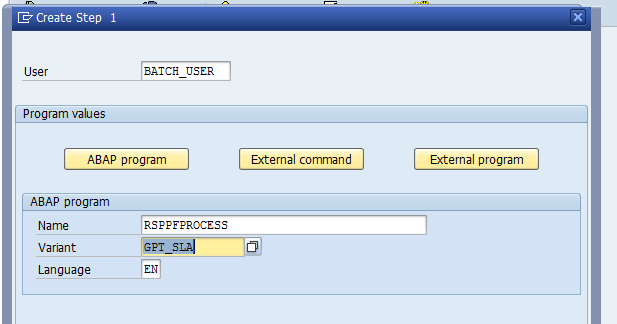
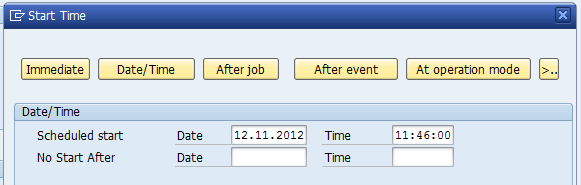
Save as variant Save Transaction: SM36
Manually run for the first time If you remove the “dialog” check box Check call:
Section 3 - Self Service (anonymous access)
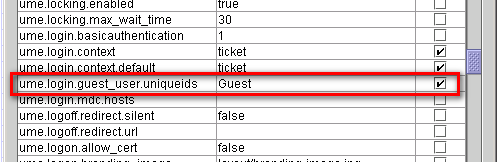
First you must check the UME parameters using the offline config tool.
Enter the user ID of the anonymous users in the User Management Engine (UME) property ume.login.guest_user.uniqueids.
The default is “Guest” but you can multiple anonymous named users like: anon1, anon2, anon3. Save and restart Java stack.
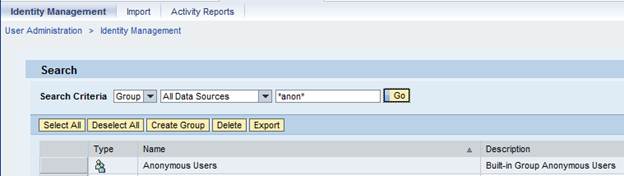
Create/Check anonymous userIDs.
Now do a quick test to ensure that the new settings are active. Navigate to the below URL: <http/https>://<server>:<port>/irj/portal/anonymous You should get an error like the below (provided that nothing has been configured in the past)
This shows that the Guest user has logged in successfully but because there are currently no roles assigned you get an error.
Now that we have configured the basics we need to introduce some content. In this example we will be creating an anonymous self-service page for solution manager service desk. The idea is that it will allow for anybody on the network to log calls into the Solution Manager Service Desk without the need of an account in the EP portal or Solution Manager.
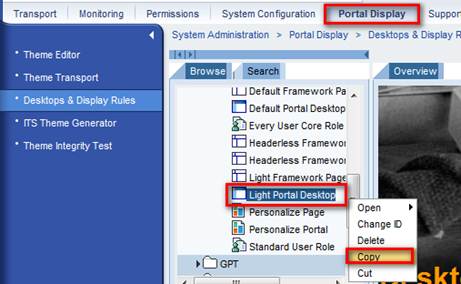
Create anonymous desktop. Go to System Administration à Portal Display à Desktops and display rules
Now paste the desktop to your desired location and rename accordingly: Using the same method as above also copy a suitable framework page. In our example we opted for the headerless framework.
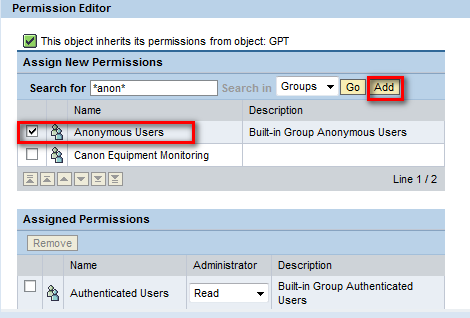
On the newly created desktop assign the copied framework and an existing theme as shown above. Save and now set the permissions:
Ensure that the “Anonymous users” group has read access.
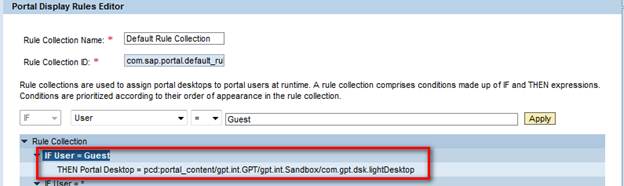
Now we will change the master/default rule collection so that if an anonymous user logs in they will be redirected to the new desktop. System Administration à Portal Display à Desktop and display rules Search tab, select “rule collection” and search
Select both master rule and the default rule and update as per the below:
Make sure that this is the first rule and the you include all anonymous users if you have more than one.
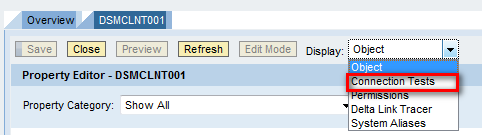
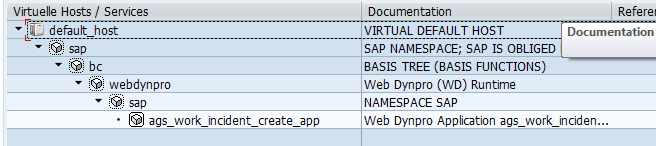
Create anonymous Role/iViews. First we will create an iview that will point to the service desk incident create webdynpro sitting on the solution manager system. Check system connection to solution manager: System administration à system configuration à system landscape
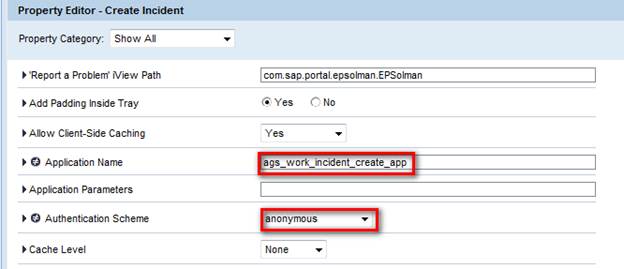
Now navigate to the PCD and create the new iView:
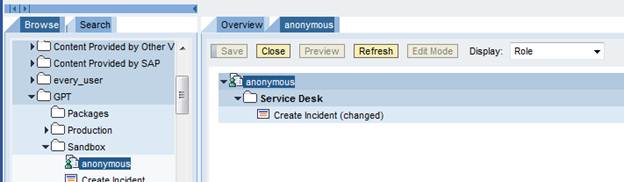
The point here is that the authentication scheme must be “anonymous” Navigate to the PCD and create a new role in the desired location:
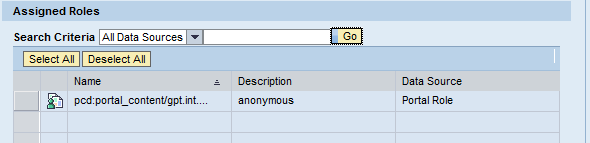
Assign via a delta link the “create incident” iview as shown. Navigate to the UME via the user administration tab:
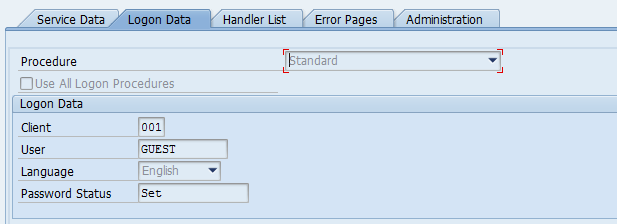
Modify Assigned roles tab Save. The final step is to create the anonymous user in the backend system (Solution Manager) and also modify the service so that calls are created using the anonymous userID. In Solution manager à SU01 In solution manager à SICF Double-click to get to the details screen.
Update the details in the logon data tab:
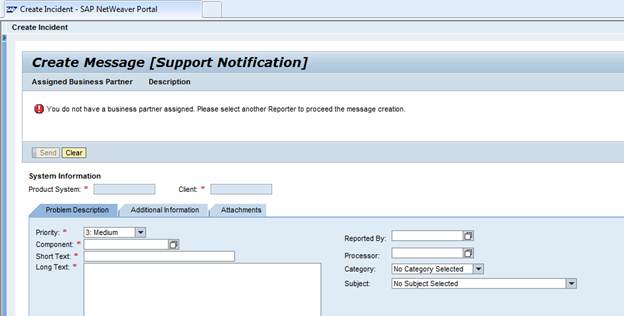
And you are done you can now test using the below link: <http/https>://<server>:<port>/irj/portal/anonymous
All done. A user can now access service desk without logging into any system or having an account in any system.
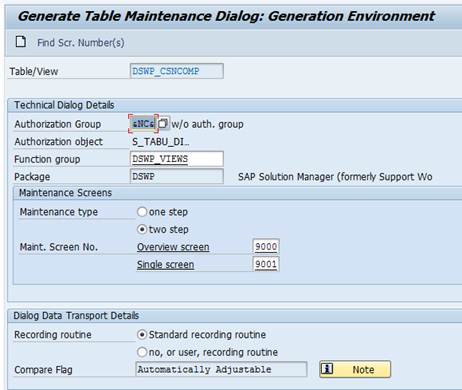
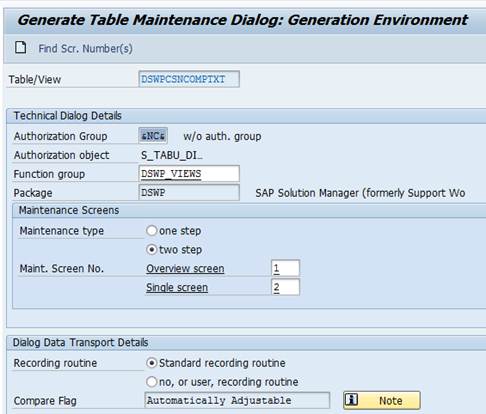
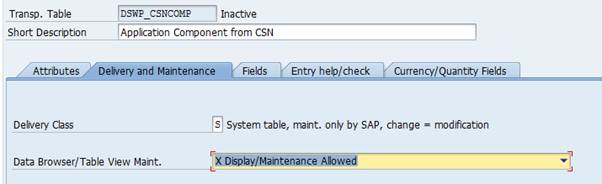
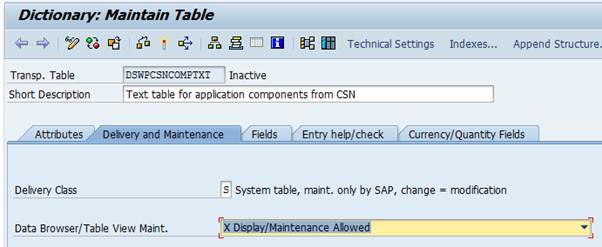
Section 4 – Create Custom Components To add custom components you must make changes to the following tables: dswp_csncomp It should be noted that these tables are updated which new components using report: DSWP_GET_CSN_COMPONENTS or via DSWP. So to use custom components you will need to stop any jobs that update these tables otherwise your changes will be lost. Transaction: SM37
To update the table you have 3 options: Below are instructions on how to complete option 2 but option 3 would be recommended. You will need to register the following objects:
Transaction: SE11
Change the maintenance attributes of both tables:
Transaction: SM30
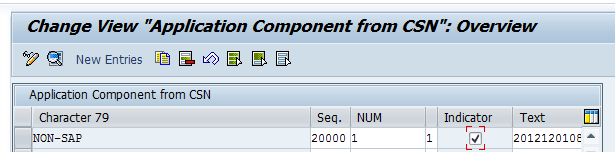
Use your own number range (in this case 2000) Seq. = Node number (use your own number range)
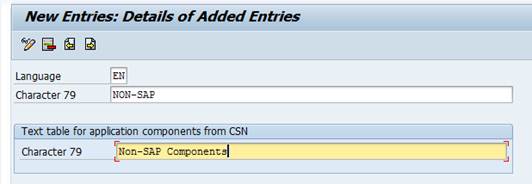
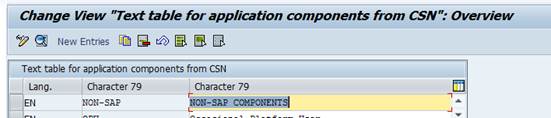
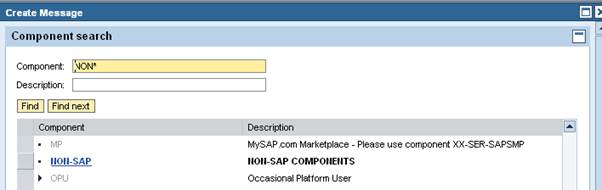
Now when selecting a component you can see “Non-SAP” but you will notice that there is no description. This is where the second table comes into the picture. SM30 à DSWPCSNCOMPTXT Language = System Language (XX)
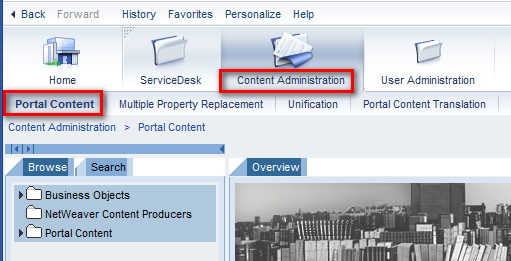
Section 5 - How to integrate Service Desk into the Enterprise portal Login to the EP portal and make sure that there is a connection to the backend solution manager system.
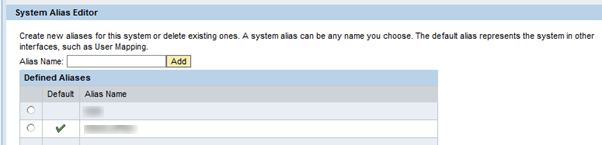
System Administration à System configuration à System Landscape
Ensure that at least one system alias exists:
Check the connection:
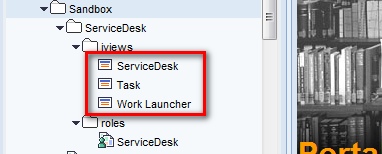
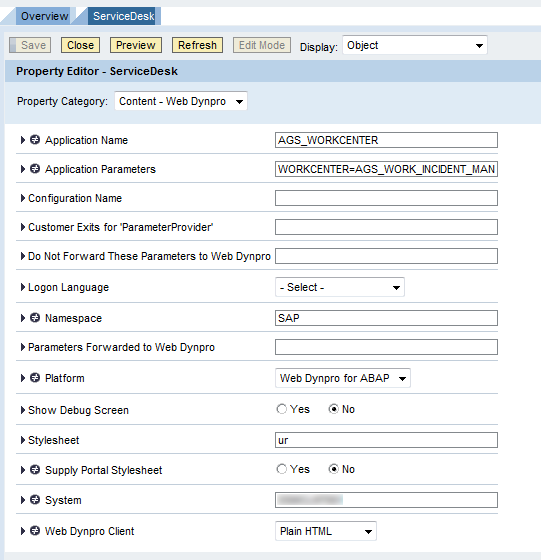
Create the Workcenter iView Content Administration à Portal Content
Create Work Launcher Iview
Set this iview to be invisible within navigation areas:
Create Task Iview Set this iview to be invisible within navigation areas:
Create Workcenter Role
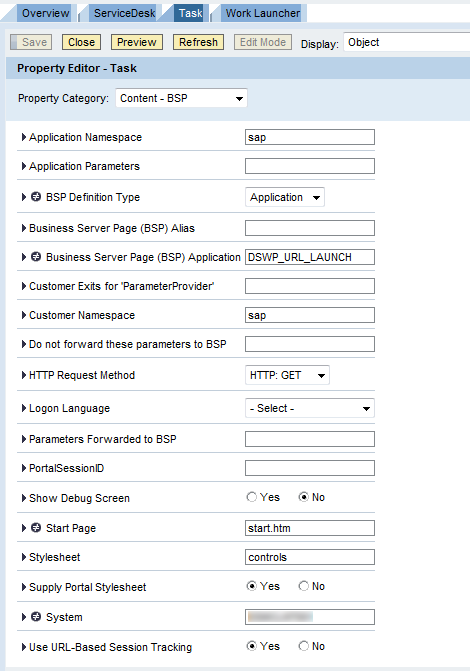
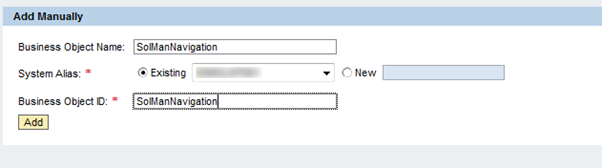
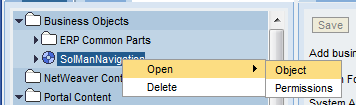
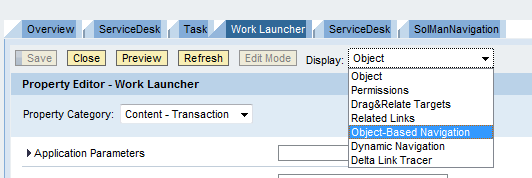
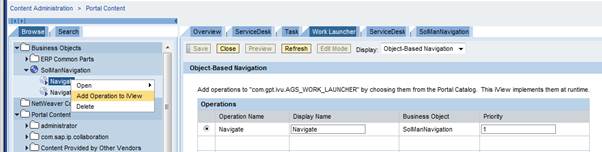
OBN Configuration
Add operation to iview Open the Work Launcher Iview:
Repeat for Task iview using the NavigateUrl
OBN has now been configured for the service desk.
Conclusion Feel free to contact me if you have any questions via the “contact” link
|
||||||||||||||||||||||||||||||